Power Platform connections to D365 and AAD Tokens

Wolftek - D365FO Integration

In this short post we wanted to offer some clarifications and options for managing the connections to D365 from the Power Platform applications. The same D365 connector is leveraged in all applications that are part of the Power suite. Just a note for the techies who like the inner workings of things, as far as the connection details, including authentication credential and tokens, the Power Platform connectors store the details behind the scenes in a APIM (Azure’s API Management).

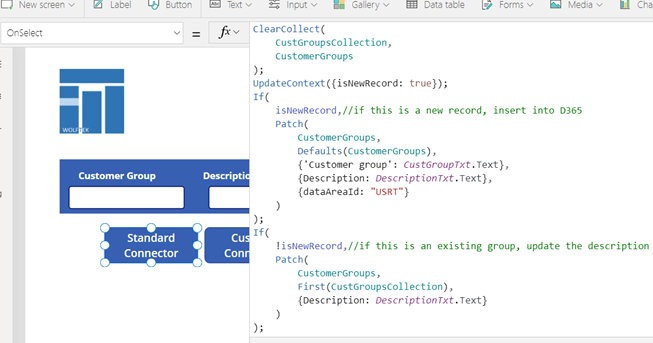
When dealing with connecting to D365 the typical use is to leverage the standard connector and configure it to leverage a generic service account. In terms of authentication this means that the Power Platform application will authenticate to AAD to get the access token, with every call to D365. Easy, convenient – takes your worries away from having to refresh the AAD tokens, which are by default set to expire within 60 minutes.

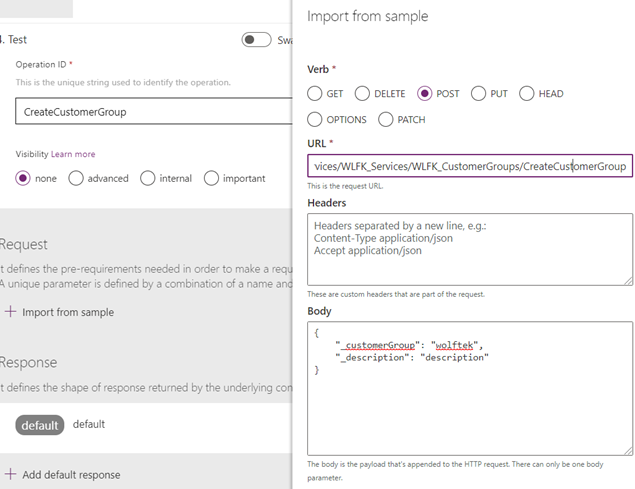
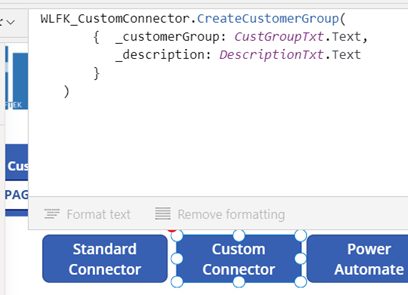
Alternatively, if you choose to connect to D365, or for that matter to any other API, which leverages AAD Authentication, using OData or RESTful Http service calls, you have to decide what makes sense in terms of access token refreshes. In most cases, again, an authentication made with every service call should be sufficient. However, if you need to be more expressive with your flow – perhaps for performance reasons – you may want to cache the access token for reuse. One straightforward way to handle it is to store the access token in a local variable the first time the call to the API is made, and then reuse it on subsequent calls. The assumption here being that the application runs for a reasonably short time, shorter than the expiration of the token.

Another, more intricate approach, which solves the issue of reusing the access token across multiple executions of the same application is to store the access token externally – for example in an Azure KeyVault. This approach also requires that you implement logic to refresh the token when it expires. For inspiration see the following blog post.

Electronic Reporting – Positive Pay in Text Format

Electronic Reporting

Introduction


In this blog we demonstrate the use of the GER (Electronic Reporting) Framework to create Bank Positive pay files in the .TXT format.

In the most recent release of Microsoft Dynamics 365 for Finance and Operations, Microsoft has released the Electronic Reporting version of the Bank Positive Pay file. The GER version aligns with the overall product strategy of uptaking the Electronic Reporting framework for all regulatory documents. But further, the timing of its release coincides with the upcoming deprecation of XSLT support in D365F&O, on which many implementations have traditionally relied to transform the Positive Pay files from the standard XML output to the format required by their banks.

The new Standard output from the GER Positive Pay configuration, is again, XML. Many companies will likely do well with this format, assuming that a middle tier solution is implemented, which transforms the XML into the Bank’s format. The alternative to the middleware solution is to create the required format directly in D365 – which is the subject of the current article.

The standard procedure to configure the Positive Pay feature is documented well in the following article, and we will assume familiarity with the general Positive Pay feature, and some degree of understanding of the GER Framework. https://docs.microsoft.com/en-us/dynamics365/finance/accounts-payable/set-up-positive-pay-er

For GER Framework information visit: https://docs.microsoft.com/en-us/dynamics365/fin-ops-core/dev-itpro/analytics/general-electronic-reporting?toc=%2Fdynamics365%2Ffinance%2Ftoc.json

Import Positive Pay Configuration


Following the documentation in the above link, import the latest Positive Pay format from the Microsoft’s Global Configuration Repository. The related/parent artifacts – Model and the Model Mapping are detected and imported automatically.


Start off the customization by creating a new Configuration Provider for your company and set it to ‘Active’. This will enable you to create custom GER components in your own Provider repository.


Open the Reporting Configurations to view the imported Positive Pay configurations


Create Custom ER Format


Now, on to the exciting part. In order to provide for the Text version of the export, we need to create a custom ER Format. This format will be based on the standard Positive Pay ER Data Model, that is shipped by MSFT.

Note the settings in the ‘Create…’ dialog:


You’ll note the newly created Format, which is Based on the standard/latest version of the MSFT’s ER Model. This ‘base’ mechanism allows for a later Re-Basing of the format, should you choose to take advantage of the newly added model elements by MSFT in the future releases.


The next step is to design the Format by adding the Text elements to its contents. Because this is a completely new Format, we’re starting with a Blank design canvas:


Add a ‘File’ Type Root element:


Set the desired encoding, and ‘Suppress BOM characters’ if needed. Some legacy Bank software cannot properly process text files with BOM, so it may be wise to remove them. You have many flexible options to use here as well, such as defining a custom file extension, setting Cultural and Format settings…We’re keeping it simple and accepting all defaults.


Next add a ‘Sequence’ element – this represents a Collection of records, which will be repeated in the file


Continue to design the Format with the required elements in the Positive Pay file, as required by the Bank. Map the format elements to the Model.

For an example, we’re providing a simple format with just a couple of fields, separated by ‘space’ and a CRLF character at the end of the Sequence, which will force each check to start on its own line in the text file.


Save the format and ‘Complete’ the ER version. This enables the new ER Format to be selected in the Positive Pay Formats configuration.


Configure and Use the ER Format


Configure the new format in Positive Pay Formats:


Assign the format to the bank account and execute the Positive Pay file run. The result is a Text file:

Power Apps – Code Reuse

Yes, we know. No self-respecting D365 developer can stand the idea of writing the same line of code twice. Code reusability is at the core of the object-oriented development and certainly is in our book. As it stands, Power Apps aren’t lending easily to code reuse at the moment. Therefore, a creative approach is called for. One way code reuse can be achieved is by implementing the logic on a ‘click’ of a button (OnSelect event) and then ‘clicking’ the button programmatically throughout the application. Note, that this approach is limited to the same-page context; and while it is possible to extend it to other pages in your application, the user experience may be compromised (page flickering etc.).

Here is a flavor of how it is done:

  • Create ‘invisible’ buttons to mimic functions – we like to prefix these with ‘function*’ to indicate their purpose.
  • Implement logic on the OnSelect event
  • In the below example, one ‘function’ calls two other functions. RefreshCollections() invokes the getSales() and the getCustomers() logic:

  • This ‘function’ could then be leveraged from different events on the page. For example, on page load and on a periodic data refresh timer tick:

Power Apps – The Three Flavors of D365 Connections

There are many different ways to connect Power Apps to D365 F&O. We’ll discuss the following three common approaches in this post:

  • Standard D365 F&O Connector
  • Custom Connector
  • Power Automate

We threw together a simple App to demonstrate these options:


Standard D365 F&O Connector

The use case here is simple. If you’re able to leverage the Standard F&O Connector, go for it! For simple update scenarios the connector does the job fairly well. Use the standard Patch function to insert or update the data.

Here is a simple example of creating or updating Customer Groups with a standard connector:

Custom Connector

The tool of choice for anything more complex and custom. This feature gives you the full flexibility that comes with custom services in D365.

Really briefly, we threw together a custom RESTful service in D365 and wrapped it in a Custom Connector:

Call the custom connector on button click:


Power Automate

The very nice fallback to the above methods is Power Automate. The use case here are scenarios that call for iteration of collections, multiple staggered actions, etc.


AIF Error – ContractFilter mismatch at the EndpointDispatcher

If you’re seeing this error when consuming an AIF service, the reason may be that changes were made to the service object in the AOT, without regenerating the incremental CIL and reactivating the inbound port.

In our case, one of the developers changed the namespace of the service in the AOT from the default ‘http://tempuri.org’ to ‘http://schemas.microsoft.com/dynamics/2011/01/services.’ The service was refreshed in the ‘Services’ form, and the inbound test file was updated with the correct namespace. However, since the Inbound Port wasn’t reactivated, the service endpoint (in our case the client used a File System Adapter), was still deployed with the old namespace, resulting in the error below. Reactivating the port (and Incremental CIL) updates the endpoint with the proper namespace and resolves the issue.

The request failed with the following error: The message with Action ‘http://schemas.microsoft.com/dynamics/2008/01/services/<Service>/<Action> cannot be processed at the receiver, due to a ContractFilter mismatch at the EndpointDispatcher. This may be because of either a contract mismatch (mismatched Actions between sender and receiver) or a binding/security mismatch between the sender and the receiver. Check that sender and receiver have the same contract and the same binding (including security requirements, e.g. Message, Transport, None).
View the exception log for more details.

DIXF Crash – Decimals in CSV Source files

Wolftek.Dynamics.AX

We have noted an issue with the DIXF *.CSV source file import, where the presence of decimal values causes the DIXF service to crash. The issue occurs with standard AX entities, in our case the SalesLines entity. The error details in the Event Log are quite obscure, rendering the fix unintuitive.

Yet, the solution is very simple. To get around the error, you can change the CSV file extension association from Excel to Notepad. As can be seen below, the file type in the Windows Explorer changed from ‘Microsoft Excel Comma Separated Values File’ to a ‘CSV File.’ As a result, the CSV files, containing decimal values, import without an issue.

Before:

After:

AIF Sales order document service – XML Mystery


We were asked to troubleshoot an interesting issue. The client was generating the sales order confirmation documents, leveraging the standard AIF SalesOrder service. The generated XML document contained incongruent data. The Header section, driven by the SalesTable data, contained information from an entirely different sales order, than the one being confirmed. The Lines section, on the other hand, was absolutely correct – information coming from the correct sales order.

The simplified XML looked as follows. Note the SalesId in the Header section (A) is not the same as the SalesId in the Lines section (B). The actual sales order being confirmed was B– the SalesId in the Lines section.


I’m sure you would agree that this picture is bizarre, to say the least. The AIFCorrelation also ended up being skewed. While the document history indicated that the document belonged to the correct SalesId B, the actual correlation was pointing to the incorrect SalesId A.

What this turned out to be was an incorrect customization added to the axSalesTable class. The developer added a new field to the document, by extending the class with a new parm method. Unfortunately, he had made the mistake of creating an inner join between the table from which he wanted to pull the value and the salesTable, and did so using the axSalesTable’s global table buffer variable salesTable – the buffer that drives all of the information in the Header section of the document, when the object is serialized into XML! The inner join resulted in a selection of an entirely different salesTable record and reset the salesTable buffer!


Mystery solved J


DIXF ODBC Source Automation – AX2012 R3


The AX2012 R3 version of DIXF has introduced automation for file based integrations. It is now possible to configure a periodic processing to monitor a directory for incoming files and to import them into the DIXF staging tables. Furthermore, the ‘Execute Target Step’ setting on the definition group execution, allows the source-to-staging process to also execute the staging-to-target logic. This turns DIXF into a rounded solution, which supports full end-to-end source to target scenarios out of the box. Add to all this the excellent staging and tracking capabilities, and this turns DIXF into an excellent candidate for integrations, rivaling in many respects the AIF framework.

The automation functionality described above had to be custom coded in the previous versions of AX – see the following blog for example.

What is still missing from this version of DIXF, however, is the automation capabilities for other sources, such as ODBC. That is, if you’re reading the source data from SQL, for example, you’re still unable to execute the import steps in a Periodic batch job.

If you do need to implement such automation, have a look at the following script for inspiration.

static void DIXF_Automation_ODBC(Args _args)

{

    DMFDefinitionGroupEntity entity = DMFDefinitionGroupEntity::find(‘<Processing Group>’, ‘<Entity>’);

    DMFStagingWriterContract contract = new DMFStagingWriterContract();

    DMFStagingWriterService service;

    contract.parmExecutionID(‘wolftek1’); //todo: get from num seq

    contract.parmDefinationGroupName(Entity.DefinitionGroup);

    contract.parmEntityNameList(Entity.Entity);

    contract.parmFilePath(entity.QueryForODBC);

    contract.parmRunInBatch(true);

    contract.parmExecuteTargetStep(true);

    service = new DMFStagingWriterService();

    service.executeService(contract);

}

AIF Error – Return type void is not supported

Wanted to mention this briefly, in hope that it may save someone some headaches.

In case you are seeing the following error in the AIF Exception log: “Return type void is not supported,” followed by “Unsupported type,” there may be a compilation issue with one of the axBc classes of the service.

Change the Model Manifest’s Deployment Layer

As you may know the AX utilities – AXUtil and PowerShell – do not support changing the destination layer in the model manifest. The model, by default, gets imported into the same layer, from which it was exported. For reference refer to: https://technet.microsoft.com/en-us/library/hh433512.aspx.

This said, if you need to import the model into a different layer, than the one from which it was exported, you can employ the following procedure.

Open the binary *.axmodel file for editing in a text editor, in order to modify its manifest. The caveat here is that Notepad, for instance, cannot be used, as it can’t properly display/save the binary information. One editor that we like utilizing is SciTE, which can be downloaded here: http://www.scintilla.org/SciTEDownload.html.

Once opened in the editor, change the model’s manifest, to specify an alternate deployment layer and save the file.